Upgrading our Basebord Trim: Part 2
Wow! Can not thank you all enough for your comments on Mom and Dad's closet doors! They were so grateful and flattered that so many of you took the time to read the post and check out the mock ups. They loved all your feedback! (Some good points about the mis-matched door hardware.) I will keep you posted on their decisions/progress, but I think Mom's favorite potential paint color for the doors is that medium grey-blue (option No. 3, not as dark as navy, but darker than the lightest blue).
In the meantime, I wanted to update you guys on where we stand currently with the RapidFit baseboard trim we are installing over our old baseboards in the dining room. (Read part 1 of the process here and a little background info here.)
So far we've put in one work day with my father-in-law and we made a lot of progress. Its not all done, but its enough that every time I walk in the dining room I get a huge smile on my face:)

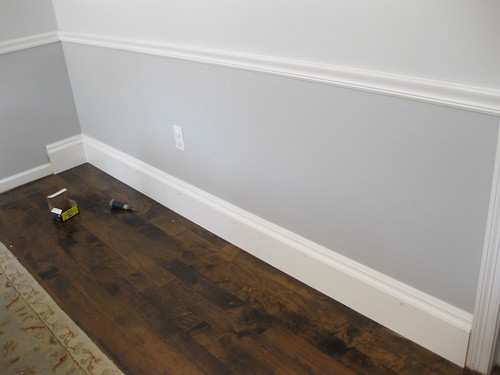
Cue angels singing!!! Isn't it so much better!! I mean, I laugh at that old trim, its just pathetic next to this:) Plus, look at the crisp white line now between the new baseboard and the floor, it makes the floors look so much more finished...now that there's not that walnut stain creating a dirty gradient between the floor and the walls. Yay!!!
A couple things have changed since we last talked now that we actually started this project. (Isn't that always the way?!) First, remember how I mentioned that you are supposed to cut away a small piece of your existing trim (the part right next to your door casings) and use the RF Transition Blocks to "transition" the new RF baseboards back to your existing, probably narrower, doors?

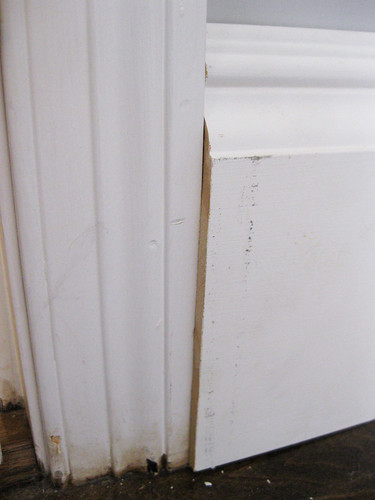
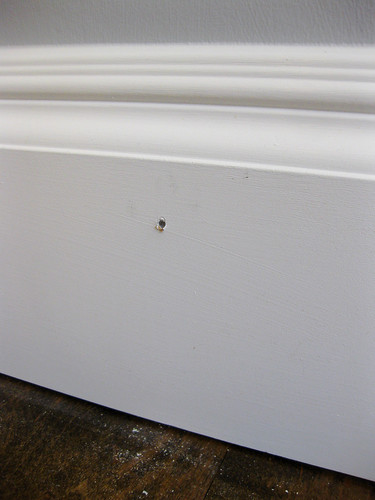
Well, after a brainstorming session, we decided to totally forgo this step! My very handy, construction experienced father-in-law (let's go with "FIL" from now on) was a little leery about how we were going to cut out those pieces of our existing trim. So we decided to test out how the new RF molding would look if we just butted it right up to the door casings. And we discovered that if we were to paint the exposed side edge of it white, we actually didn't mind having it stick out just a bit from the door trim. It somehow looks a lot cleaner than having that back slope of the transition block in there and it will save us a ton of time and energy. Here's what I mean:
 {imagine that exposed side bit of MDF painted white and the door trim touched up with the same white paint, as well as the new molding itself (I have to still go back and fill in all the nail holes and paint over all the scuff marks we made while installing)...I think its going to blend pretty well, right?}
Another thing that didn't quite work out as planned was the miter/"chop" saw. Turns out that our new RF molding was too tall for FIL's saw, so we had no sure-fire standard way to cut all the miters for the interior corners of the room (RapidFit also provides decorative corner blocks so you don't have to worry about this step, but I wanted the clean, simple normal mitered corners for our new trim). So at first FIL tried hand cutting each of the 45 degree angles. And it looks good here, but when we put up the adjacent piece (that was also cut by hand), it wasn't a perfect fit (also because our walls aren't perfectly square).

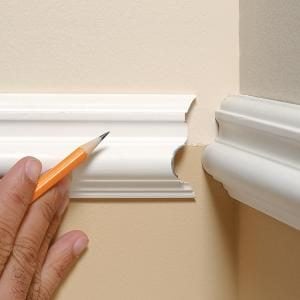
That's when he decided to try and "cope" the corners:
"This age-old carpenter's trick involves cutting the profile on the end of one molding and fitting it against another like pieces of a puzzle."
 {from "How to Cope Joints" by the The Family Handyman...and here's a great Step by Step Tutorial from them}
Coping allows you to install one of the pieces of molding flat side right up to the corner. For the other piece of trim, you hand-cut out the profile of the adjoining piece, holding the two ends up together and perfecting your shape as you go, getting the coped piece to really fit snug against the non-coped piece. The result, when done right (go FIL!) and filled with caulk, looks just like a mitered corner, but its not:)


So this part of the puzzle was slightly more complicated than I had anticipated. But once we had done one corner, the rest were fairly straightforward and easy...easy because FIL did all the coping:)
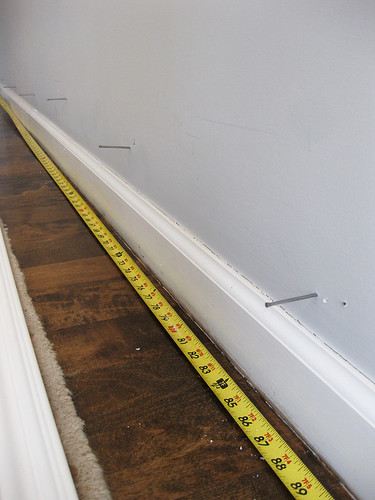
Once we had each piece of molding cut and knew it was going to fit, we had to find the studs in the wall so that we would know where to nail. We did it the old school way (as opposed to using a "stud finder")...we took the new trim down and based on the electrical outlets or trying to spot a nail in our existing trim (which we assumed would be at a stud), we tested a bit by banging a nail into the wall until we knew we had found a stud. Then we kept going 16" off center in either direction, hammering more nails into our money spots.

After we had the whole length figured out, we took out the nails (keeping the tape measure in place), put back up the new RF trim and used our calculations to be sure we were installing the new molding into studs. The compressor for FIL's nail gun decided not to work right as went to nail in the first piece of new baseboard (!) so we opted for hand-nailing in the top row of finish nails to hold the boards in place for now and will use the nail gun next time he comes (so much easier and faster) to finish out the bottom row of nails. We also added a line of caulk to the top of each piece of baseboard where it meets the wall to give it that finished look.

We managed to get three sides of the room installed but still have to do the fourth wall (this last wall runs a few inches longer than the 12 feet that the RF boards come in, so we have fit two boards together and do a seam there close to the corner):

Once the last board is up (and we've caulked all the corners and top edge) and we have the nail gun working, we'll finish nailing in all the boards, cover the nail holes with putty, sand them down and I'll repaint everything white (including those exposed edges of MDF at the doors) so it looks fresh and brand new again.
I am so excited with how this whole thing is turning out. I can't wait to complete this room and get going on the living room, kitchen and foyer!! (Guess I should go have Paul call FIL and see if he's free this weekend!)

In the meantime, I wanted to update you guys on where we stand currently with the RapidFit baseboard trim we are installing over our old baseboards in the dining room. (Read part 1 of the process here and a little background info here.)
So far we've put in one work day with my father-in-law and we made a lot of progress. Its not all done, but its enough that every time I walk in the dining room I get a huge smile on my face:)
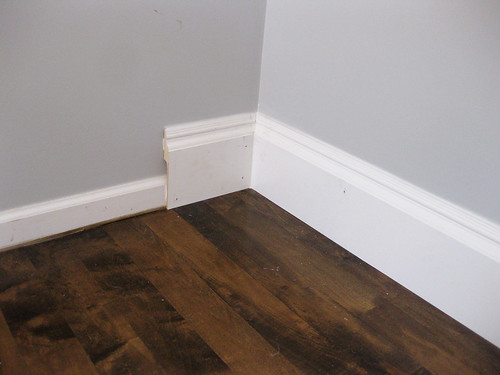
Cue angels singing!!! Isn't it so much better!! I mean, I laugh at that old trim, its just pathetic next to this:) Plus, look at the crisp white line now between the new baseboard and the floor, it makes the floors look so much more finished...now that there's not that walnut stain creating a dirty gradient between the floor and the walls. Yay!!!
A couple things have changed since we last talked now that we actually started this project. (Isn't that always the way?!) First, remember how I mentioned that you are supposed to cut away a small piece of your existing trim (the part right next to your door casings) and use the RF Transition Blocks to "transition" the new RF baseboards back to your existing, probably narrower, doors?

Well, after a brainstorming session, we decided to totally forgo this step! My very handy, construction experienced father-in-law (let's go with "FIL" from now on) was a little leery about how we were going to cut out those pieces of our existing trim. So we decided to test out how the new RF molding would look if we just butted it right up to the door casings. And we discovered that if we were to paint the exposed side edge of it white, we actually didn't mind having it stick out just a bit from the door trim. It somehow looks a lot cleaner than having that back slope of the transition block in there and it will save us a ton of time and energy. Here's what I mean:
 {imagine that exposed side bit of MDF painted white and the door trim touched up with the same white paint, as well as the new molding itself (I have to still go back and fill in all the nail holes and paint over all the scuff marks we made while installing)...I think its going to blend pretty well, right?}
Another thing that didn't quite work out as planned was the miter/"chop" saw. Turns out that our new RF molding was too tall for FIL's saw, so we had no sure-fire standard way to cut all the miters for the interior corners of the room (RapidFit also provides decorative corner blocks so you don't have to worry about this step, but I wanted the clean, simple normal mitered corners for our new trim). So at first FIL tried hand cutting each of the 45 degree angles. And it looks good here, but when we put up the adjacent piece (that was also cut by hand), it wasn't a perfect fit (also because our walls aren't perfectly square).

That's when he decided to try and "cope" the corners:
"This age-old carpenter's trick involves cutting the profile on the end of one molding and fitting it against another like pieces of a puzzle."
 {from "How to Cope Joints" by the The Family Handyman...and here's a great Step by Step Tutorial from them}
Coping allows you to install one of the pieces of molding flat side right up to the corner. For the other piece of trim, you hand-cut out the profile of the adjoining piece, holding the two ends up together and perfecting your shape as you go, getting the coped piece to really fit snug against the non-coped piece. The result, when done right (go FIL!) and filled with caulk, looks just like a mitered corner, but its not:)


So this part of the puzzle was slightly more complicated than I had anticipated. But once we had done one corner, the rest were fairly straightforward and easy...easy because FIL did all the coping:)
Once we had each piece of molding cut and knew it was going to fit, we had to find the studs in the wall so that we would know where to nail. We did it the old school way (as opposed to using a "stud finder")...we took the new trim down and based on the electrical outlets or trying to spot a nail in our existing trim (which we assumed would be at a stud), we tested a bit by banging a nail into the wall until we knew we had found a stud. Then we kept going 16" off center in either direction, hammering more nails into our money spots.
After we had the whole length figured out, we took out the nails (keeping the tape measure in place), put back up the new RF trim and used our calculations to be sure we were installing the new molding into studs. The compressor for FIL's nail gun decided not to work right as went to nail in the first piece of new baseboard (!) so we opted for hand-nailing in the top row of finish nails to hold the boards in place for now and will use the nail gun next time he comes (so much easier and faster) to finish out the bottom row of nails. We also added a line of caulk to the top of each piece of baseboard where it meets the wall to give it that finished look.
We managed to get three sides of the room installed but still have to do the fourth wall (this last wall runs a few inches longer than the 12 feet that the RF boards come in, so we have fit two boards together and do a seam there close to the corner):
Once the last board is up (and we've caulked all the corners and top edge) and we have the nail gun working, we'll finish nailing in all the boards, cover the nail holes with putty, sand them down and I'll repaint everything white (including those exposed edges of MDF at the doors) so it looks fresh and brand new again.
I am so excited with how this whole thing is turning out. I can't wait to complete this room and get going on the living room, kitchen and foyer!! (Guess I should go have Paul call FIL and see if he's free this weekend!)


Jealous! That base board looks just stunning, what a difference! A nice family project, and thank goodness for your FIL and his talents to help navigate the finer points of installation! Can I hire him...???!!!
ReplyDeleteCathy
Wow! The new moulding looks great! Most of the baseboards in our house are the puny kind. What a difference these make! Looking forward to seeing the finished project, in due time.
ReplyDeleteStunning is an understatement! Floors look AMAZING now! Can't wait to see the reveal.
ReplyDeleteDenise
WOW! Those baseboards are so chunky and dreamy. It will be sooooo worth all of the work and effort.
ReplyDeleteLove the new baseboard.
ReplyDeleteGosh, I never knew this product existed -- wonder if they make "covers" for door frames too?! Looks terrific. As for how the baseboard sticks out a bit when it meets the door frame, in our house that kind of thing was dealt with by cutting the corner that sticks out at a 45 degree angle so it tapers to the door frame (like the miter joint you were trying in the corners, but not a full miter -- just cutting enough off the corner to match the depth of the door frame). Don't know if that makes any sense, and don't know how to put a diagram in the comments!
ReplyDeleteLots of hard work, but it looks so so great. Huge improvement in your home!
ReplyDeleteLooks great! I can't wait to add this to our new home
ReplyDeleteIs this product available for stairway molding?
ReplyDeleteWhere can you buy this molding that fits over the smaller molding?
ReplyDeleteLowes
DeleteThis comment has been removed by the author.
ReplyDeleteChoosing the right baseboards and trim can completely transform the look of any room, adding polish and character to your space. At Log Home Shoppe, we offer high-quality options designed to complement both rustic and modern interiors. Our craftsmanship ensures long-lasting durability and a beautiful finish, making your home upgrade both stylish and functional. Baseboards and Trim
ReplyDelete