DIY Hand Painted Sign Tutorial
Hi! I wanted to follow up the hand painted sign I made my mom for Mother's Day with a post about the process. If you remember, here's the before (an ugly plaque/sign that I bought at Home Goods, immediately regretted purchasing, but kept around instead of returning it just in case I might need it at some point):

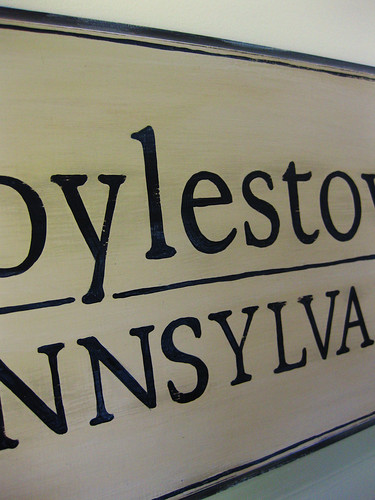
Here's the after (my sign that I painted over it with):

So, here's what I did:
Step 1: painted over the old sign with 2 coats of primer (I used Kilz because I had some lying around)

Step 2: painted the entire sign with 2 coats of flat black

Step 3: painted just the inside of the sign with 2 coats of the main color (a kind of beige/taupe/mushroom that I'm having trouble getting right in these photos). I just used some leftover wall paint that I had from a past project because I knew it was pretty close to the kind of colors Mom uses in her home. I didn't want the base to be perfectly solid/flat, so I added some texture/randomness with acrylic paint - wiped on some sepia, burnt umber, etc. and then wiped most of it with a paper towel, flicked white drops onto the surface with a toothbrush, etc. It ended up being pretty subtle, but worth it.

Step 4: created the text I wanted (full size) on the computer (after messing around with a few fonts) and printed it out (the printout didn't fit on one page, so I used two regular 8 1/2" x 11" sheets, lined them up and taped them together)

Step 5: lined up the design and traced it onto the sign using Saral Wax Free Transfer Paper (its like good old fashioned carbon copy paper). I made the printout of the text red (anything other than black will work) so that when I was tracing it onto the board with a pencil, I would be able to see my pencil marks and know what I had already gone over.

Step 6: painted the letters using a small brush and the same flat black paint I used to coat the sign. (This part actually took a lot less time than I thought, it was all the prep to get here to the fun part that took the most time.) After I was done with the text, I decided to add a small black stroke around the border, it just needed a bit of something more, so I free-handed that part.


Step 7: I wanted to distress everything a bit, so I used some sandpaper over the whole thing, but wasn't as successful as I hoped. I did manage to take off some of the black paint of the letters which I liked (see the how the edges of the "y" and "l" for instance are a bit rough in the below photo as compared to the pre-sandpaper image above?). Oh well, next time I'll experiment a bit more with this.
Step 8: sprayed the whole sign with a couple layers of Plaid Decorators Glaze Matte Sealer to seal and protect it.
Overall, this was a lot easier, a lot more fun and took a lot less time than I expected! I definitely want to try making some more signs. Have any of you ventured into hand painted (or vinyl decal) sign land? Is your process any different?
I'm a little late, but I'm linking this up to Layla and Kevin's How To's Day over at The Lettered Cottage (head on over there for tons of tutorial and step by step posts)!!

Here's the after (my sign that I painted over it with):
So, here's what I did:
Step 1: painted over the old sign with 2 coats of primer (I used Kilz because I had some lying around)
Step 2: painted the entire sign with 2 coats of flat black
Step 3: painted just the inside of the sign with 2 coats of the main color (a kind of beige/taupe/mushroom that I'm having trouble getting right in these photos). I just used some leftover wall paint that I had from a past project because I knew it was pretty close to the kind of colors Mom uses in her home. I didn't want the base to be perfectly solid/flat, so I added some texture/randomness with acrylic paint - wiped on some sepia, burnt umber, etc. and then wiped most of it with a paper towel, flicked white drops onto the surface with a toothbrush, etc. It ended up being pretty subtle, but worth it.
Step 4: created the text I wanted (full size) on the computer (after messing around with a few fonts) and printed it out (the printout didn't fit on one page, so I used two regular 8 1/2" x 11" sheets, lined them up and taped them together)
Step 5: lined up the design and traced it onto the sign using Saral Wax Free Transfer Paper (its like good old fashioned carbon copy paper). I made the printout of the text red (anything other than black will work) so that when I was tracing it onto the board with a pencil, I would be able to see my pencil marks and know what I had already gone over.
Step 6: painted the letters using a small brush and the same flat black paint I used to coat the sign. (This part actually took a lot less time than I thought, it was all the prep to get here to the fun part that took the most time.) After I was done with the text, I decided to add a small black stroke around the border, it just needed a bit of something more, so I free-handed that part.
Step 7: I wanted to distress everything a bit, so I used some sandpaper over the whole thing, but wasn't as successful as I hoped. I did manage to take off some of the black paint of the letters which I liked (see the how the edges of the "y" and "l" for instance are a bit rough in the below photo as compared to the pre-sandpaper image above?). Oh well, next time I'll experiment a bit more with this.
Step 8: sprayed the whole sign with a couple layers of Plaid Decorators Glaze Matte Sealer to seal and protect it.
Overall, this was a lot easier, a lot more fun and took a lot less time than I expected! I definitely want to try making some more signs. Have any of you ventured into hand painted (or vinyl decal) sign land? Is your process any different?
I'm a little late, but I'm linking this up to Layla and Kevin's How To's Day over at The Lettered Cottage (head on over there for tons of tutorial and step by step posts)!!


Looks good! I used that same treatment for my shop sign!
ReplyDeleteMeg
Hi Sarah! Great job and good thoughts on art or pieces that one has grown tired of!
ReplyDeleteBe sure to enter my awesome $250 Giveaway from Tracy Porter!!
xoxo
Karena
Art by Karena
Hi Sarah! It's so good to hear from you! (Thanks for adding your creativity to the DIY Project Parade!) I love your recycled sign! You did a beautiful job! I want a sign for our kitchen. Of course, DIY. Collecting ideas and inspiration. Thanks for sharing yours! I love when gifts are personal/custom. :)
ReplyDeleteHope all is well! Hi little Maura!
Take care!
Roeshel
Saw this on Pinterest and had to check it out since I'm from Doylestown!
ReplyDeleteI grew up in Montgomery County and still live in Montgomery County - small world!
ReplyDeleteLove this!
ReplyDelete