Upgrading our Baseboard Trim: Part 1
Thank you so much for all your comments on which rug would be better for the family room! I'll probably end up pulling the trigger on the Overstock one because its way cheaper and more practical...if it ever comes back in stock:(
Back in April I posted about how we would like to upgrade our baseboard trim to taller, more architecturally substantial stuff. Plus when we had our floors redone/new ones installed, the bottom bit of all the baseboards got covered in stain and needed to be repainted. In order to accomplish both these things at once, we decided to try this RapidFit product that they have at Lowes...its composite base molding that looks totally normal from the front, but is hollowed out in the back so that you can install it right over your existing trim:)
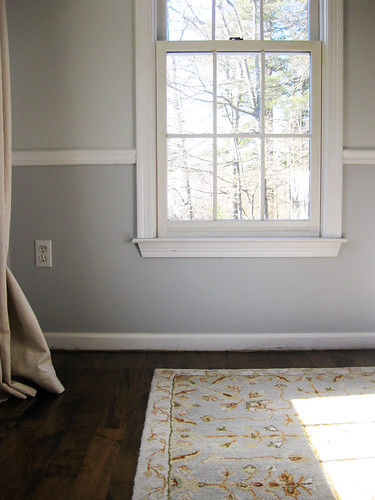
 {old, short, dirty baseboard trim covered in stain}
Even though doing this in four of our downstairs rooms is on my home goal to-do list for 2012, we figured we'd start with the dining room first as sort of a practice run. Its the most simple room in terms of shape and its the least used room (so if we really screw it up its not that big of a deal).
Warning, there are no after pics in this post! All we've done so far is buy the necessary boards and prep them, but I thought this warranted its own post. However, to get you excited about how cool it will look if and when we do it properly, here's a little test shot. Before with our dirty, short baseboard trim:
And a little glimpse at the potential by just propping up an unpainted piece of RapidFit against the wall:

Yeah baby!!! It's going to be worth the work:)
Ok, back to the process. Here's what we've done so far:
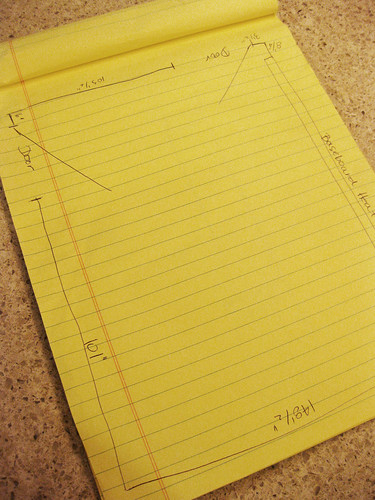
Step 1: Measured our room.
Its always best to know your measurements before heading out to purchase everything. So I drew a little floor plan complete with dimensions and door openings, baseboard heaters, etc. for the dining room.
 {meh, not great, but it did the trick}
Step 2: Headed to Lowes, made a plan, got our stuff.
From what I can gather, the RapidFit base molding comes in 2 heights: 5 1/4" and 7 1/4" and the boards are either 8 feet or 12 feet long. We're going big instead of going home, so we're using the taller size.
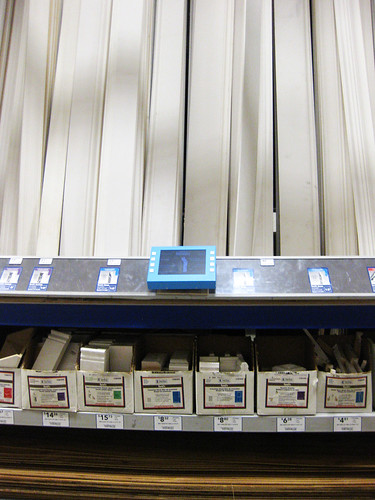 {bad shot of the RapidFit section at Lowes...5 1/4" trim on the left, 7 1/4" on the right...various accompanying accessories below and even a little monitor where you can watch videos on how to install the stuff, see before and after pics, etc.}
One wall in our dining room is pretty much all baseboard heaters, which means we don't need any trim for it. One wall is an uninterrupted span that's just a bit longer than 12' (doh!), which means we will need to piece together a full 12' board and a few inches from another board. The two remaining walls have door openings on them. The long spans on both are slightly longer than 8' but less than 12'. Doing all the math we realized that if we had Lowes cut two 12' boards for us at approximately the two different lengths needed for each long span of those two walls, the leftovers would be enough to cover the short distances on each side of the doors as well as the few inches on either side of the baseboard heaters.
 {Paul entertaining Maura while I do all the talking, calculating, and other handy stuff!}
 {cutting our boards on this crazy cool saw}
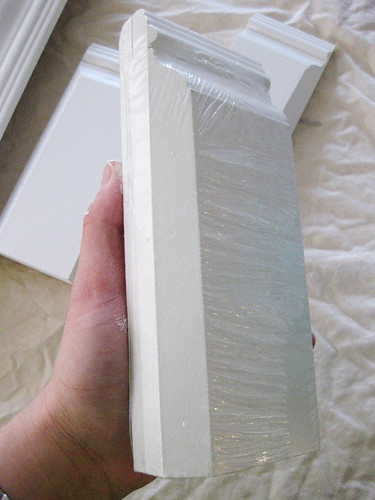
Something to consider when figuring out your plan and getting your supplies is the thickness or depth of your existing trim. I had previously tested out a piece of the RapidFit and made sure it would fit over our current baseboards. For anyone wondering if this might work for them, here's a shot I snapped of the RapidFit catalog:

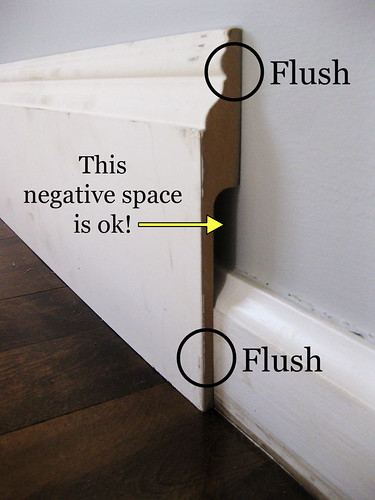
I also discovered that fortunately, the new stuff fits pretty well snug over our old stuff in terms of depth. See how when I hold the RapidFit piece up to my wall its flush at the top where it meets the drywall and its also pretty much flush where the inside hollow part meets the front face of my trim? This is a good thing:)
Now, there is a chance that your trim could be a lot narrower than the hollowed out hole in the back of the RapidFit pieces. If this is the case, you will probably have to use the RF Spacers to keep the installation of your new molding plum. (You do not want to nail in at the bottom of the molding and have it angle back into the wall because there was air in between your trim and the
back of the RapidFit.) Here's a pic of the RF catalog that shows how the spacers help:

They're self-adhesive and I guess you use them evenly spread out along your boards. Each spacer is 1/8" thick and you can stick as many as you like together to add up to the desired thickness you need to fill your gap. A bag of 50 spacers goes for $7.27 at our Lowes.
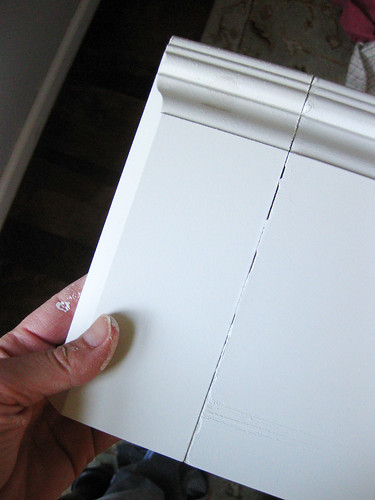
They also have this stuff in crown molding and door casings if you want to upgrade either of those. We're just going to do the baseboards which means we need to worry about how the new molding is going to meet up with our current door casings. This is the part where it gets a bit tricky. RapidFit has these things called Transition Blocks, which for lack of a better word, help transition your new RF baseboards to your old door trim. They come in pairs because you need one transition block on either side of each door. Here's what they look like:
They are the exact same as the long RF baseboard pieces, except that the inner side slants back toward the wall at an angle to meet up with any door trim that is not as deep as the new RF stuff. They are also not hollow on the back side! So, in this one instance, when you only do your baseboards and not your door casings, you do actually have to get rid of just a bit of your old trim....just enough so that the Transition Block can fit in there and bridge the gap between whatever you have around your door and the new trim you are installing. It looks like this:

Once you've removed those small bits on either side of your doors and put the transition blocks in, you just butt up your long piece of new RF molding right up against the outer, flat end of the transition block, like so. Presumably, after puttying, sanding and painting the seam, you'll never know it was there:)
Ok, two more quick notes for the planning stage. In terms of the corners of the room, RapidFit also has a bunch of different corner decorative blocks if you don't want to have to miter the corners of the boards. We, however, are going to miter the corners just like you would do on regular trim because I like the simple, clean lines of it. Also, in the RapidFit catalog there's a great installation check list that you can fill out that helps you determine how much of everything you need, etc.
Step 3: Painted the boards.
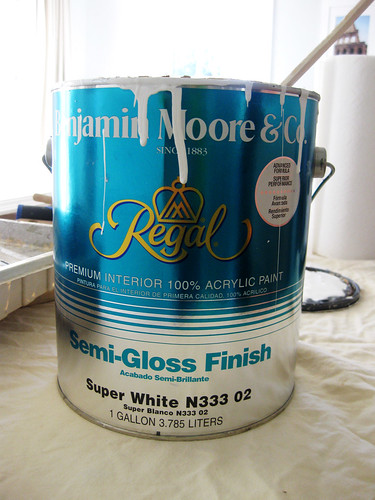
I've always heard its better/easier to paint trim before installing (even though you have to do some touch up painting afterwards), so we went that route. (This stuff is pre-primed and ready for paint.) I just used this Benjamin Moore semi-gloss Super White (right off the shelves, no special mixing) that I already had on hand (and have been using for other trim touch ups around the house).
Set up everything right on the dining room table and did two coats on each board. (Propped up the trim on books so that the paint wouldn't make the boards stick to the drop cloths/sheets.)
 {not shown, the 12' board for the long uninterrupted wall}
Sweet. All ready to go. The next step is to get installing! We are going to borrow the necessary tools from Paul's dad for this. He's going to bring them by this weekend - the nail gun, some sort of small hand saw for the pieces of existing trim that need to be cut out to fit the transition blocks, and...hold please while I Google what that saw is called that cuts 45 degree angles...ok, I'm back. Duh, miter saw. Yeah, he's bringing that too:) And giving us a lesson!
Now I will admit that Paul and I are not the best budgeters around! We have not looked into how much it would cost to take out the old baseboard trim and completely redo it the "proper" way with new baseboard trim. So we have no idea if this way is any cheaper or way more expensive. It just seems a lot easier to us and because we're amateurs (and for us time is money with a toddler running around) we're going to go this way for at least this room (and hopefully the others if it comes out like we hope it will). I can tell you how much the RapidFit stuff that we will be using/needing goes for:
PS. I'm not sure if Home Depot carries this product or not. Anyone out there know? There's a Lowes like less than a mile from us so we always go there and if they don't have something we head down the highway 3 exits (like 4 minutes) to the nearest HD:)
PPS. Not that you ever thought this, but I am in no way being reimbursed by Lowes or RapidFit for this post (gosh, I haven't even actually put the stuff up yet!).
Back in April I posted about how we would like to upgrade our baseboard trim to taller, more architecturally substantial stuff. Plus when we had our floors redone/new ones installed, the bottom bit of all the baseboards got covered in stain and needed to be repainted. In order to accomplish both these things at once, we decided to try this RapidFit product that they have at Lowes...its composite base molding that looks totally normal from the front, but is hollowed out in the back so that you can install it right over your existing trim:)
Even though doing this in four of our downstairs rooms is on my home goal to-do list for 2012, we figured we'd start with the dining room first as sort of a practice run. Its the most simple room in terms of shape and its the least used room (so if we really screw it up its not that big of a deal).
Warning, there are no after pics in this post! All we've done so far is buy the necessary boards and prep them, but I thought this warranted its own post. However, to get you excited about how cool it will look if and when we do it properly, here's a little test shot. Before with our dirty, short baseboard trim:
And a little glimpse at the potential by just propping up an unpainted piece of RapidFit against the wall:
Yeah baby!!! It's going to be worth the work:)
Ok, back to the process. Here's what we've done so far:
Step 1: Measured our room.
Its always best to know your measurements before heading out to purchase everything. So I drew a little floor plan complete with dimensions and door openings, baseboard heaters, etc. for the dining room.
{meh, not great, but it did the trick}Step 2: Headed to Lowes, made a plan, got our stuff.
From what I can gather, the RapidFit base molding comes in 2 heights: 5 1/4" and 7 1/4" and the boards are either 8 feet or 12 feet long. We're going big instead of going home, so we're using the taller size.
{bad shot of the RapidFit section at Lowes...5 1/4" trim on the left, 7 1/4" on the right...various accompanying accessories below and even a little monitor where you can watch videos on how to install the stuff, see before and after pics, etc.}One wall in our dining room is pretty much all baseboard heaters, which means we don't need any trim for it. One wall is an uninterrupted span that's just a bit longer than 12' (doh!), which means we will need to piece together a full 12' board and a few inches from another board. The two remaining walls have door openings on them. The long spans on both are slightly longer than 8' but less than 12'. Doing all the math we realized that if we had Lowes cut two 12' boards for us at approximately the two different lengths needed for each long span of those two walls, the leftovers would be enough to cover the short distances on each side of the doors as well as the few inches on either side of the baseboard heaters.
{Paul entertaining Maura while I do all the talking, calculating, and other handy stuff!}{cutting our boards on this crazy cool saw}Something to consider when figuring out your plan and getting your supplies is the thickness or depth of your existing trim. I had previously tested out a piece of the RapidFit and made sure it would fit over our current baseboards. For anyone wondering if this might work for them, here's a shot I snapped of the RapidFit catalog:
I also discovered that fortunately, the new stuff fits pretty well snug over our old stuff in terms of depth. See how when I hold the RapidFit piece up to my wall its flush at the top where it meets the drywall and its also pretty much flush where the inside hollow part meets the front face of my trim? This is a good thing:)
Now, there is a chance that your trim could be a lot narrower than the hollowed out hole in the back of the RapidFit pieces. If this is the case, you will probably have to use the RF Spacers to keep the installation of your new molding plum. (You do not want to nail in at the bottom of the molding and have it angle back into the wall because there was air in between your trim and the
back of the RapidFit.) Here's a pic of the RF catalog that shows how the spacers help:
They're self-adhesive and I guess you use them evenly spread out along your boards. Each spacer is 1/8" thick and you can stick as many as you like together to add up to the desired thickness you need to fill your gap. A bag of 50 spacers goes for $7.27 at our Lowes.
They also have this stuff in crown molding and door casings if you want to upgrade either of those. We're just going to do the baseboards which means we need to worry about how the new molding is going to meet up with our current door casings. This is the part where it gets a bit tricky. RapidFit has these things called Transition Blocks, which for lack of a better word, help transition your new RF baseboards to your old door trim. They come in pairs because you need one transition block on either side of each door. Here's what they look like:
They are the exact same as the long RF baseboard pieces, except that the inner side slants back toward the wall at an angle to meet up with any door trim that is not as deep as the new RF stuff. They are also not hollow on the back side! So, in this one instance, when you only do your baseboards and not your door casings, you do actually have to get rid of just a bit of your old trim....just enough so that the Transition Block can fit in there and bridge the gap between whatever you have around your door and the new trim you are installing. It looks like this:
Once you've removed those small bits on either side of your doors and put the transition blocks in, you just butt up your long piece of new RF molding right up against the outer, flat end of the transition block, like so. Presumably, after puttying, sanding and painting the seam, you'll never know it was there:)
Ok, two more quick notes for the planning stage. In terms of the corners of the room, RapidFit also has a bunch of different corner decorative blocks if you don't want to have to miter the corners of the boards. We, however, are going to miter the corners just like you would do on regular trim because I like the simple, clean lines of it. Also, in the RapidFit catalog there's a great installation check list that you can fill out that helps you determine how much of everything you need, etc.
Step 3: Painted the boards.
I've always heard its better/easier to paint trim before installing (even though you have to do some touch up painting afterwards), so we went that route. (This stuff is pre-primed and ready for paint.) I just used this Benjamin Moore semi-gloss Super White (right off the shelves, no special mixing) that I already had on hand (and have been using for other trim touch ups around the house).
Set up everything right on the dining room table and did two coats on each board. (Propped up the trim on books so that the paint wouldn't make the boards stick to the drop cloths/sheets.)
{not shown, the 12' board for the long uninterrupted wall}Now I will admit that Paul and I are not the best budgeters around! We have not looked into how much it would cost to take out the old baseboard trim and completely redo it the "proper" way with new baseboard trim. So we have no idea if this way is any cheaper or way more expensive. It just seems a lot easier to us and because we're amateurs (and for us time is money with a toddler running around) we're going to go this way for at least this room (and hopefully the others if it comes out like we hope it will). I can tell you how much the RapidFit stuff that we will be using/needing goes for:
- one 7 1/4" x 12' board = $40.20
- one pair of 7 1/4" transition blocks = $8.80
So its going to run us about $150 to do the dining room (keep in mind this is pretty much for only three walls because the fourth has such a long expanse of baseboard heat on it). Can anyone comment on how this compares to a similiar install of new baseboards?
PS. I'm not sure if Home Depot carries this product or not. Anyone out there know? There's a Lowes like less than a mile from us so we always go there and if they don't have something we head down the highway 3 exits (like 4 minutes) to the nearest HD:)
PPS. Not that you ever thought this, but I am in no way being reimbursed by Lowes or RapidFit for this post (gosh, I haven't even actually put the stuff up yet!).


The heftier molding took my breath away! Fantabulous!! Can't wait to see the finished room. (LOL love the reference to the exits on the highway.)
ReplyDeleteDenise
WOW Sarah! This looks like a fantastic product and a relatively simple way to upgrade your home's moulding. I love that you guys "went big." My 1976 home has rooms filled with wimpy 3" baseboards....may have to strategically give this a try someday!
ReplyDeleteCathy
I admire that you guys are taking the time to do this and beef up the trim. It's one of those things that some people wouldn't even bother with, but you know that this trim is going to make a world of difference in the look of your room. A great great choice! Our baseboards aren't horrible. I'd probably say they are 4" with a beveled capping (if that's what it's even called). I actually just saw a really great article in Renovation Style that broke down all of the various architectural elements of trim that I thought was so interesting. I laughed when you took a quick break to google the name of the tool. You always put so much thought into your posts Sarah which is so nice. How's your parents bedroom coming along? I know, random question, but I really liked that post.
ReplyDeleteThis is going to look amazing! I had heard of rapidfit but didn't know Lowe's was selling it. Thanks for all the detailed info!
ReplyDeleteMake a couple of test miter cuts before you do the big pieces. I would lay the baseboard paint side down when I do the cuts
ReplyDeleteHey. So how did this go in the end? Do you like the look? Any issues during install? My wife and I are considering putting this in.
ReplyDeleteBut no Lowes store in our state has it in stock, so we have to decide if we're confident enough to order it from Lowes' web site.
I recently saved your post. Now it must be three years since you started the baseboards. This product seems to good to be true. Last year with a contractor I replaced all the downstairs flooring and went with the taller baseboards. It was a heafty bit of cash to have a carpenter replace with the more desirable baseboards. Now I am planning to update the upstairs baseboards. I believe you found a more economical way and I would love to hear more about your experience. I love hearing from bloggers who are ahead of me in the house projects I have to tackle. Y'all are my go to gals! Your update would be greatly appreciated. SQ
ReplyDeleteSo, this really is more economical? And is it correct that the baseboard you're installing now is 7 1/4"? I'm hesitant to try this, but I'd love to know how it worked out. And I'd love to see the after pics. Thanks.
ReplyDeletesitus terbaru sabung ayam pw 2018
ReplyDeletesabung ayam jago bangkok
ReplyDeleteGreat article on upgrading baseboard trim. Planning is very key for quality installation. Thanks a ton! John
ReplyDeleteSabung ayam terbaik se indonesia dan Asia
ReplyDeletesabung ayam filipina
Ayam ayam jago Petarung Terbaik di Asia
ReplyDeleteayam bangkok vietnam
Ayam ayam jago Terbaik di Indonesia
ReplyDeletes1288 sabung ayam
Bonus Spesial Bolavita Taruhan Bola Online Kemerdekaan dan Asian Games 2018
ReplyDeleteAyam ayam jago Terbaik di Indonesia
ReplyDeleteagen sabung ayam
Ayam ayam jago Terbaik di Indonesia
ReplyDeletesabung ayam filipin
Ayam ayam jago Terbaik di Indonesia
ReplyDeleteyoutube adu ayam
Ayam ayam jago Terbaik di Indonesia
ReplyDeletesabungayam.co
Mau yang lebih ????? ayam tarung
ReplyDeleteAyam ayam jago Terbaik di Indonesia
ReplyDeletewww.s128.net
Ayam ayam jago Terbaik di Indonesia
ReplyDeletewww ayam bangkok
Ayam ayam jago Terbaik di Indonesia judi sabung ayam
ReplyDeleteAyam ayam jago Terbaik di Indonesia tarung ayam bangkok
ReplyDeleteTips dan Trick Bermain Judi Online
ReplyDeleteAgen Togel Singapura
Agen Togel Sidney
Museumbola Slot IDN
Museumbola Slot Habanero
Museumbola Slot Pulsa
Museumbola Slot Pragmatic
Museumbola Joker123
AKSES SEGERA SITUS KAMI 1 ID BANYAK PERMAINAN
WA OFFICIAL : +6283157394921
Nice Article :)
ReplyDeleteFollow My Website:
MUSEUM AYAM - SITUS SABUNG AYAM ONLINE TERPERCAYA
CLUB388
SV388
LIVECHATS128
MUSEUM TOTO